
GATAS documentation
GATAS PULSE Builder’s Guide
This guide provides step-by-step instructions for setting up GATAS.
Tip
It’s highly recommended to also have the status Led connected, it will give you install feedback on some of the basic state of GATAS.
Use case 1: You want to receive additional traffic data via gatas Connect, you have your EFB running on your phone
flowchart TB
    GATAS -->|📶 Wi-Fi| HOTSPOT
    HOTSPOT -->|🌐 Cellular Data| GatasConnect

    GATAS --> |BLE| IPAD
    GATAS <--> |📡 868Mhz| Radio[fa:fa-tower-broadcast FLARM/OGN/ADSL ]


    GatasConnect[fa:fa-server GATAS Connect]
    GatasConnect@{ shape: procs }

    GATAS[fa:fa-microchip GATAS]
    GATAS@{ shape: rounded}

    Radio[fa:fa-tower-broadcast FLARM/OGN/ADSL]
    Radio@{ shape: cloud }
    IPAD[fa:fa-tablet-screen-button iPad / EFB<br />SkyDemon ]
    IPAD@{ shape: card }
Setup
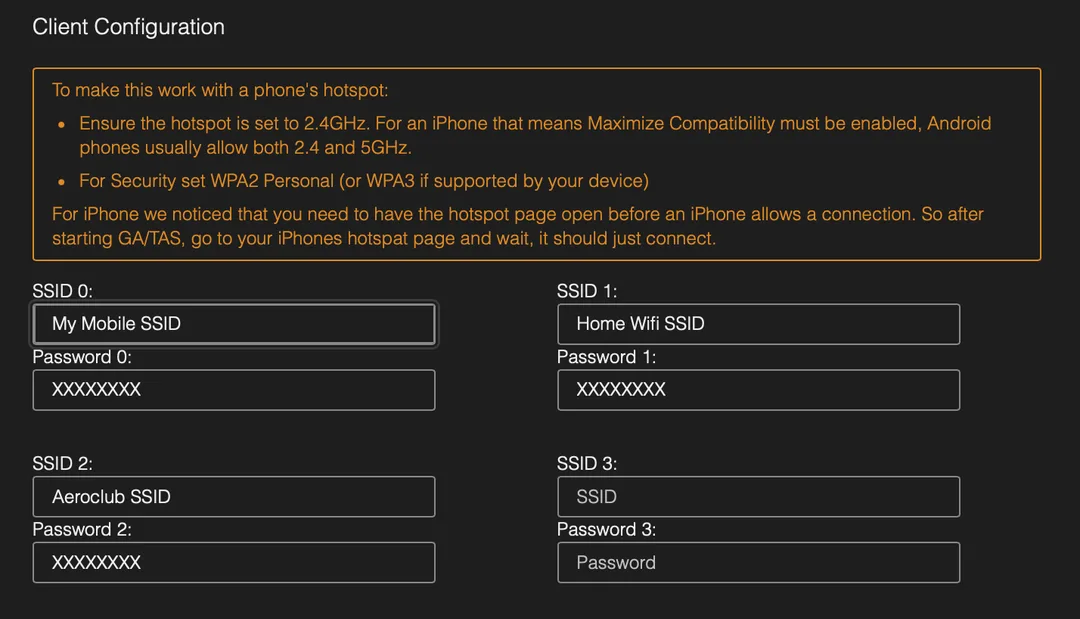
- In GATAS under WIFI Service add your mobile phone’s hotspot under Client Configuration.
Tip
In Additional to my phone’s hotspot I also add my WIFI Network at home so I can configure GATAS on my webbrowser on my computer. Since GATAS will try connect to any available network in the list. Once a connect drops, it will try other networks seemlessly. When I just drive away from home, it will connect to my hotspot.
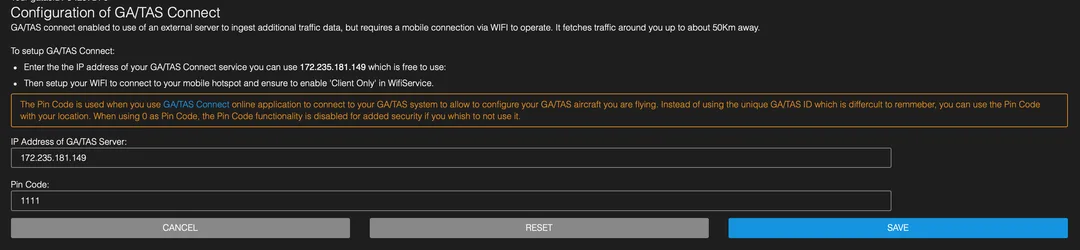
- Enable gatasConnect module

- Configure gatas Connect with a pincode.
Note
iPhone Limitations iPhones use connection isolation when used as a hotspot this means that unfortunately we cannot provide GDL90 data to an other device connected to the hotspot. However, if the other device supports Bluetooth BLE, you can use that to provide NMEA data to your EFB, SkyDemon allows you to do this.
Use case 2: GATAS used as hotspot, mobile phone connects to GATAS
flowchart TB
    HOTSPOT --> |📶 Wi-Fi| GATAS

    IPAD --> |WIFI| GATAS
    GATAS <--> |📡 868Mhz| Radio[fa:fa-tower-broadcast FLARM/OGN/ADSL ]

    HOTSPOT[fa:fa-mobile-screen-button Mobile Phone Hotspot<br />SkyDemon/ForeFlight/EasyVFR]
    HOTSPOT@{ shape: card}

    GATAS[fa:fa-microchip GATAS]
    GATAS@{ shape: rounded}

    Radio[fa:fa-tower-broadcast FLARM/OGN/ADSL]
    Radio@{ shape: cloud }
    IPAD[fa:fa-tablet-screen-button iPad / EFB<br />SkyDemon/ForeFlight/EasyVFR ]
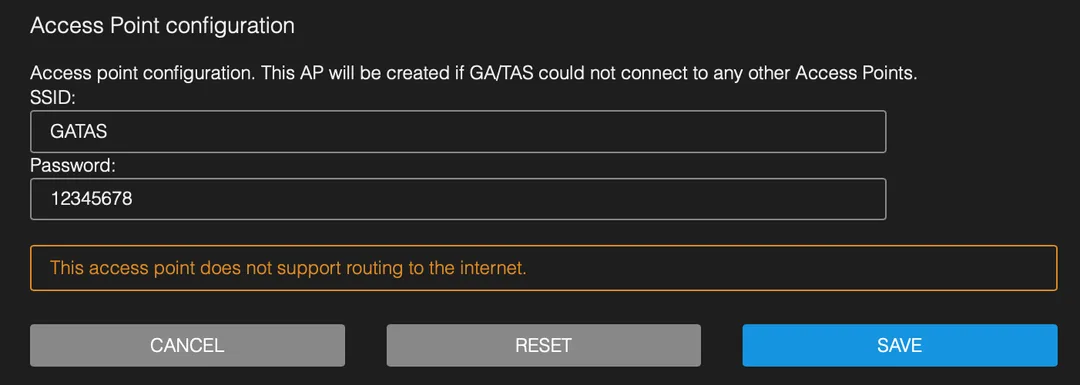
IPAD@{ shape: card }- Keep the GATAS Access Point with default SSID or configure a new name and password.
Warning
No Internet ADS-B In this situation GATAS will not provide any internet traffic data for MLAT and ADSB-OUT
Use case 3: Mobile router used as hotspot, GATAS connects to hotspot, Mobile Phone connects to hotspot.
flowchart TD
    MobileRouter --> GatasConnect
    GATAS <-->|📶 Wi-Fi| MobileRouter
    PHONE -->|🌐 Cellular Data| MobileRouter

    IPAD --> |BLE| GATAS
    IPAD2 --> |WIFI| MobileRouter
    GATAS <--> |📡 868Mhz| Radio[fa:fa-tower-broadcast FLARM/OGN/ADSL ]

    MobileRouter@{ shape: card}

    PHONE[fa:fa-mobile-screen-button Phone<br />SkyDemon/ForeFlight/EasyVFR]
    PHONE@{ shape: card}

    GATAS[fa:fa-microchip GATAS]
    GATAS@{ shape: rounded}

    Radio[fa:fa-tower-broadcast FLARM/OGN/ADSL]
    Radio@{ shape: cloud }
    IPAD[fa:fa-tablet-screen-button iPad<br />EFB<br />SkyDemon ]
    IPAD@{ shape: card }
    IPAD2[fa:fa-tablet-screen-button iPad<br />EFB<br />SkyDemon ]
    IPAD2@{ shape: card }
Setup is exactly as in Use case 1
Use case 4: Groundstation mode
In groundstation mode, GATAS is installed at an airfield and acts as a stationary transmitter. It receives traffic data via gatasConnect (typically MLAT data) over Wi-Fi and rebroadcasts it over ADS-L O-Band for up to 10 aircraft in the vicinity.
Regular airfield
At a regular airfield, the groundstation receives internet traffic data and transmits it over ADS-L so that nearby aircraft equipped with ADS-L receivers can benefit from this data.
flowchart TB
    ROUTER -->|🌐 Internet| GatasConnect
    GATAS <-->|📶 Wi-Fi| ROUTER

    GATAS -->|📡 868Mhz ADS-L O-Band| Aircraft1
    GATAS -->|📡 868Mhz ADS-L O-Band| Aircraft2

    GatasConnect[fa:fa-server gatasConnect<br />MLAT Data]
    GatasConnect@{ shape: procs }

    ROUTER[fa:fa-wifi Router / Hotspot]
    ROUTER@{ shape: card }

    GATAS[fa:fa-microchip GATAS<br />Groundstation Mode]
    GATAS@{ shape: rounded}

    Aircraft1[fa:fa-plane Aircraft with ADS-L]
    Aircraft1@{ shape: card }
    Aircraft2[fa:fa-plane Aircraft with ADS-L]
    Aircraft2@{ shape: card }
Setup
-
Connect GATAS to a Wi-Fi network with internet access under Client Configuration in the WIFI Service.
-
Enable the gatasConnect module and configure it with a pincode.
-
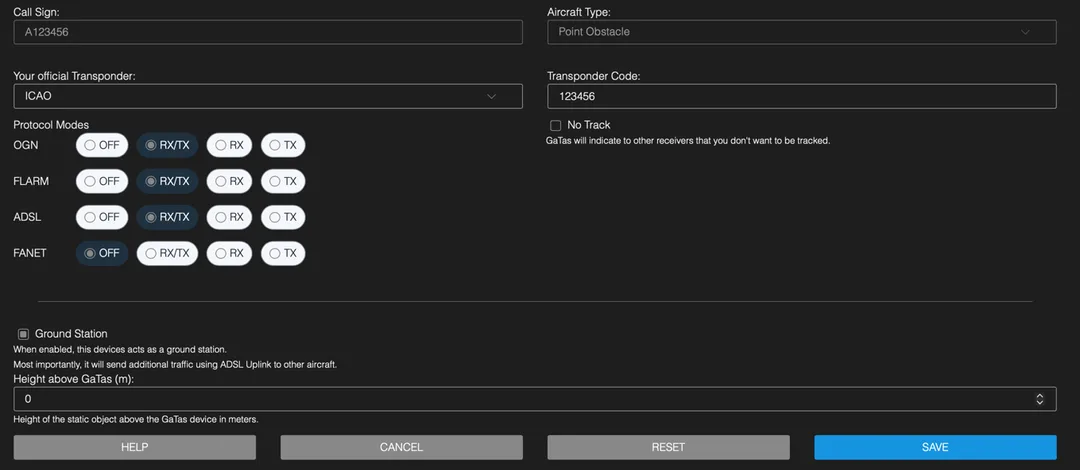
Enable groundstation mode.
Glider field
For glider fields, the groundstation works the same way but adds an important safety feature: you can configure an altitude to indicate the operating height of the glider field. This broadcasts a warning to surrounding traffic that a glider field is active at that location and altitude. This will be send over all enabled Procols (FANET/OGN/FLARM and ADS-L)
flowchart TB
    ROUTER -->|🌐 Internet| GatasConnect
    GATAS <-->|📶 Wi-Fi| ROUTER

    GATAS -->|📡 868Mhz ADS-L O-Band| Aircraft1
    GATAS -->|📡 868Mhz ADS-L O-Band| Aircraft2
    GATAS -->|📡 868Mhz FLARM M-Band| Aircraft3

    GatasConnect[fa:fa-server gatasConnect<br />MLAT Data]
    GatasConnect@{ shape: procs }

    ROUTER[fa:fa-wifi Router / Hotspot]
    ROUTER@{ shape: card }

    GATAS[fa:fa-microchip GATAS<br />Groundstation Mode<br />Glider Field Altitude Set]
    GATAS@{ shape: rounded}

    Aircraft1[fa:fa-plane Aircraft with ADS-L]
    Aircraft1@{ shape: card }
    Aircraft2[fa:fa-plane Aircraft with ADS-L]
    Aircraft2@{ shape: card }
    Aircraft3[fa:fa-plane Aircraft with FLARM]
    Aircraft3@{ shape: card }
Setup
-
Follow the same setup steps as for a regular airfield groundstation.
-
Configure the glider field altitude to indicate the operating height.

Tip
Setting the altitude broadcasts a warning to surrounding traffic that a glider field is active, helping pilots avoid the area or exercise extra caution.